Good morning gentlemen! I ran sudo apt install network-manager-l2tp-gnome as suggested and rebooted, but the nm-applet wasn’t showing. Tried to just run it as described in the manual https://manual.lubuntu.me/stable/G/AdvancedNetworking.html but it said bash: nm-applet: command not found I then tried sudo apt install nm-applet like I did previously in Lubuntu, but it said E: Unable to locate nm-applet. I kind of know what a “backport” is, but I’ve never tried it. I’m saying it just in case it would be easier to “backport” the newer network-manager into my Lubuntu installation.
1 Like
The following page lists the files in Debian sid’s network-manager-gnome package:
/usr/bin/nm-applet is definitely there. You could explicitly try sudo apt install network-manager-gnome.
1 Like
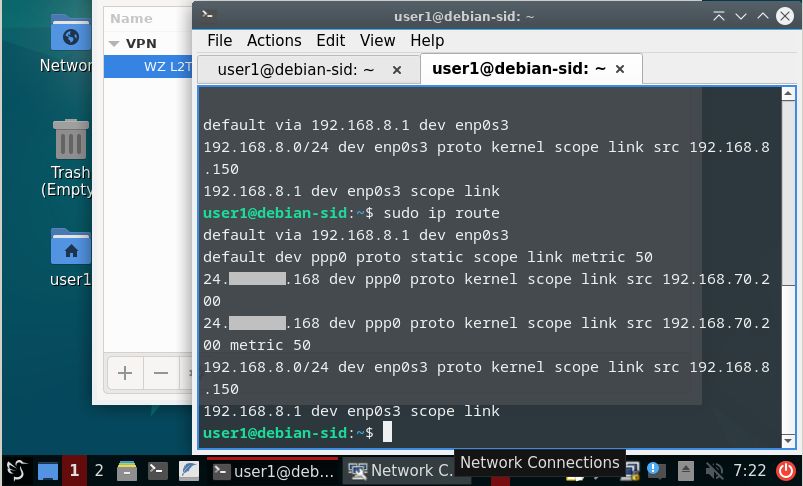
Thank you, this worked. Unfortunately the route is still there twice. I apologize, I didn’t install guest-additions into this one for the quick test, so I can’t copy paste, but here’s a screenshot instead.
And I just re-checked on the host (physical machine) and in Windows, the route is there only once. So I suggest that we wait a few days until I have a chance to install Lubuntu on the spare laptop so we could take VBox out of the equation.
1 Like
It wasn’t clear if you tried the new ipv4.auto-route-ext-gw setting that was introduced with NetworkManager 1.42.0 to disable the automatically added routes to the external gateway? I previously mentioned, it can be permanently set with nmcli by doing :
sudo nmcli con mod 'WZ L2TP Test' ipv4.auto-route-ext-gw yes
Ignore that, I meant to say that it can be permanently turned off by doing:
sudo nmcli con mod 'WZ L2TP Test' ipv4.auto-route-ext-gw no
If you want to see all of the VPN connection’s settings, issue :
sudo nmcli con show 'WZ L2TP Test'I apologize. I installed the Guest Additions and here’s what I did:
user1@debian-sid:~$ sudo nmcli con mod 'WZ L2TP Sid' ipv4.auto-route-ext-gw no
[sudo] password for user1:
Then I connected to the VPN using the nm-applet GUI. And once connected, I ran:
user1@debian-sid:~$ sudo ip route
default via 192.168.8.1 dev enp0s3
default dev ppp0 proto static scope link metric 50
24.xxx.xxx.168 dev ppp0 proto kernel scope link src 192.168.70.200
24.xxx.xxx.168 dev ppp0 proto kernel scope link src 192.168.70.200 metric 50
82.165.8.211 via 192.168.8.1 dev enp0s3
192.168.8.0/24 dev enp0s3 proto kernel scope link src 192.168.8.150
192.168.8.1 dev enp0s3 scope link
user1@debian-sid:~$
There are still the two ppp0 routes. But there’s also this strange IP address 82.165.8.211 which five different geolocating tools located to Karlsruhe, Germany, which is definitely not where I am at and I’m baffled/concerned where that is coming from.
I also ran the command sudo nmcli con show 'WZ L2TP Sid', in case it might be useful for checking my config:
user1@debian-sid:~$ sudo nmcli con show 'WZ L2TP Sid'
connection.id:                          WZ L2TP Sid
connection.uuid:                        9a0fa009-1a44-4fe5-89a>
connection.stable-id:                   --
connection.type:                        vpn
connection.interface-name:              --
connection.autoconnect:                 no
connection.autoconnect-priority:        0
connection.autoconnect-retries:         -1 (default)
connection.multi-connect:               0 (default)
connection.auth-retries:                -1
connection.timestamp:                   1679058814
connection.read-only:                   no
connection.permissions:                 --
connection.zone:                        --
connection.master:                      --
connection.slave-type:                  --
connection.autoconnect-slaves:          -1 (default)
connection.secondaries:                 --
connection.gateway-ping-timeout:        0
connection.metered:                     unknown
connection.lldp:                        default
connection.mdns:                        -1 (default)
connection.llmnr:                       -1 (default)
connection.dns-over-tls:                -1 (default)
connection.mptcp-flags:                 0x0 (default)
connection.wait-device-timeout:         -1
connection.wait-activation-delay:       -1
ipv4.method:                            auto
ipv4.dns:                               --
ipv4.dns-search:                        --
ipv4.dns-options:                       --
ipv4.dns-priority:                      0
ipv4.addresses:                         --
ipv4.gateway:                           --
ipv4.routes:                            --
ipv4.route-metric:                      -1
ipv4.route-table:                       0 (unspec)
ipv4.routing-rules:                     --
ipv4.replace-local-rule:                -1 (default)
ipv4.ignore-auto-routes:                no
ipv4.ignore-auto-dns:                   no
ipv4.dhcp-client-id:                    --
ipv4.dhcp-iaid:                         --
ipv4.dhcp-timeout:                      0 (default)
ipv4.dhcp-send-hostname:                yes
ipv4.dhcp-hostname:                     --
ipv4.dhcp-fqdn:                         --
ipv4.dhcp-hostname-flags:               0x0 (none)
ipv4.never-default:                     no
ipv4.may-fail:                          yes
ipv4.required-timeout:                  -1 (default)
ipv4.dad-timeout:                       -1 (default)
ipv4.dhcp-vendor-class-identifier:      --
ipv4.link-local:                        0 (default)
ipv4.dhcp-reject-servers:               --
ipv4.auto-route-ext-gw:                 0 (false)
ipv6.method:                            auto
ipv6.dns:                               --
ipv6.dns-search:                        --
ipv6.dns-options:                       --
ipv6.dns-priority:                      0
ipv6.addresses:                         --
ipv6.gateway:                           --
ipv6.routes:                            --
ipv6.route-metric:                      -1
ipv6.route-table:                       0 (unspec)
ipv6.routing-rules:                     --
ipv6.replace-local-rule:                -1 (default)
ipv6.ignore-auto-routes:                no
ipv6.ignore-auto-dns:                   no
ipv6.never-default:                     no
ipv6.may-fail:                          yes
ipv6.required-timeout:                  -1 (default)
ipv6.ip6-privacy:                       -1 (unknown)
ipv6.addr-gen-mode:                     stable-privacy
ipv6.ra-timeout:                        0 (default)
ipv6.mtu:                               auto
ipv6.dhcp-duid:                         --
ipv6.dhcp-iaid:                         --
ipv6.dhcp-timeout:                      0 (default)
ipv6.dhcp-send-hostname:                yes
ipv6.dhcp-hostname:                     --
ipv6.dhcp-hostname-flags:               0x0 (none)
ipv6.auto-route-ext-gw:                 -1 (default)
ipv6.token:                             --
vpn.service-type:                       org.freedesktop.Networ>
vpn.user-name:                          --
vpn.data:                               gateway = 24.116.13.16>
vpn.secrets:                            <hidden>
vpn.persistent:                         no
vpn.timeout:                            0
proxy.method:                           none
proxy.browser-only:                     no
proxy.pac-url:                          --
proxy.pac-script:                       --
82.165.8.211 has a hostname of ipv4.connman.net, so I guess you still have connman installed, the following will remove everything associated with the connman package:
sudo apt purge --auto-remove connman
Regarding the settings, I mainly wanted to see that ipv4.auto-route-ext-gw remains false after a VPN connection which it has, the other settings were useful, but nothing jumps out as the smoking gun.
I just tested with ipv4.auto-route-ext-gw myself.
VPN route with ipv4.auto-route-ext-gw unset or set to true:
$ ip route
default dev ppp0 proto static scope link metric 50
default via 172.16.244.2 dev ens33 proto dhcp src 172.16.244.130 metric 100
146.70.141.61 via 172.16.244.2 dev ens33 proto static metric 50
172.16.244.0/24 dev ens33 proto kernel scope link src 172.16.244.130 metric 100
172.16.244.2 dev ens33 proto static scope link metric 50
192.168.30.1 dev ppp0 proto kernel scope link src 192.168.30.2
192.168.30.1 dev ppp0 proto kernel scope link src 192.168.30.2 metric 50
VPN route with ipv4.auto-route-ext-gw set to false :
$ ip route
default dev ppp0 proto static scope link metric 50
default via 172.16.244.2 dev ens33 proto dhcp src 172.16.244.130 metric 100
172.16.244.0/24 dev ens33 proto kernel scope link src 172.16.244.130 metric 100
192.168.30.1 dev ppp0 proto kernel scope link src 192.168.30.2
192.168.30.1 dev ppp0 proto kernel scope link src 192.168.30.2 metric 50
My VPN external gateway is 146.70.141.61, looks like the route to it got removed after setting ipv4.auto-route-ext-gw to false. So don’t think it will do what I thought it would do and help in your case to remove the ppp0 routes to the external gateway.
There is a very slim chance once connman is removed and settings ipv4.auto-route-ext-gw to true (or -1 or 1), things might work for you.
Setting ipv4.ignore-auto-routes to no, will prevent all auto routes, but then you will need to manually add some of them back.
Thanks for all of your testing, I appreciate it, sorry I’m out of suggestions.
1 Like
One thing you could do for convenience is write a shell script that brings up the VPN connection and then deletes the problematic route, e.g. create a a text file with the following, lets say called vpn-up.sh :
#! /bin/sh

nmcli con up 'WZ L2TP Test' --ask
sudo ip route del 24.xxx.xxx.168 dev ppp0
Then make the vpn-up.sh file executable with the following :
chmod a+rx vpn-up.sh
To run the vpn-up.sh script (assuming it is in the same current working directory, otherwise use a different path than ./), issue:
./vpn-up.sh
You may need to tweak script by adding a sleep command for a specified number of seconds determined through trial and error, e.g.:
#! /bin/sh

nmcli con up 'WZ L2TP Test' --ask
sleep 2
sudo ip route del 24.xxx.xxx.168 dev ppp0
If you prefer to be prompted with a GUI for the VPN and sudo passwords (assuming you are still using nm-applet), you can change the script to have the following:
#! /bin/sh

nmcli con up 'WZ L2TP Test'
pkexec ip route del 24.xxx.xxx.168 dev ppp0
With the last GUI script example, you could create a desktop launcher icon that points to the script, then double click the desktop icon to launch the script. Or for the other scripts, set terminal option to yes in the launcher settings.
Once again, I thank you very much for all your help! This is useful, as I am not a programmer. Last time I tried was Fortran in the first year of uni and that’s a long time ago, done with teletype & paper tape. What I did so far was using the “Bookmark” facility of the Lubuntu file manager to save the command to delete the extra route and apply it with a simple click. And I apologize for the delay in the test on physical machine. Those installations take a lot of time, so I’m going to test/learn several things at the same time (full disk encryption & multiboot), so it’s taking me some time to get a good understanding of it all. But once I have the physical installation ready, I will test the L2TP connection too - and since it’s a laptop on different Internet connections - and will report the results here.
2 Likes
This topic was automatically closed 30 days after the last reply. New replies are no longer allowed.